If you have multiple Linux machines on your network, maybe a Raspberry Pi running a few services and a Linux Mint PC as your main workstation, setting up SSH access between them can make your life a lot easier.
With SSH, you can control your Raspberry Pi from your main machine, transfer files, or run commands remotely without needing to plug in a monitor or keyboard. And once you enable key-based authentication, you can connect instantly without typing your password every time.
In this post, I’ll walk you through the exact steps I use to:
- Install and enable the SSH server on a Linux Mint system.
- Generate and configure SSH keys for password-free access.
- Test the connection to make sure everything works smoothly.
On the target device (for example, a Raspberry Pi)
Check ssh service status with:
sudo systemctl status sshIf you see the error Unit ssh.service not found the SSH server is not installed. To install it, follow these steps:
Install the OpenSSH Server. Run:
sudo apt update
sudo apt install openssh-server
Start and Enable the SSH Service. Once installed, start the SSH service and enable it to start on boot:
sudo systemctl start ssh
sudo systemctl enable ssh
Confirm the SSH Service is Running. Verify that SSH is running with:
sudo systemctl start ssh
sudo systemctl enable ssh
After completing these steps, try connecting from your local machine again.
On the host device (Linux Mint PC)
Setting up SSH key-based authentication between your Linux Mint PC and your other Linux device (Raspberry Pi etc.):
- Generate an SSH key pair on your Linux Mint machine (your local PC).
- Copy the public key to your Raspberry Pi.
- Configure permissions on the Raspberry Pi to accept key-based authentication.
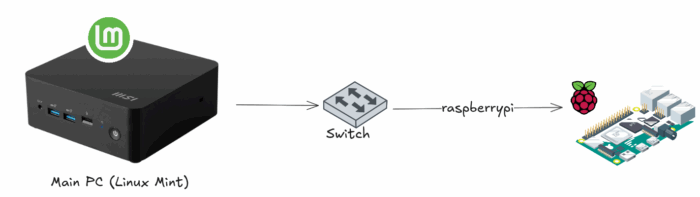
Option A: Single connection
Step 1: Create a generic key.
ssh-keygen -t rsa -b 4096This will generate a 4096-bit RSA key pair, which is more secure than shorter bits like 2048. When you run this command, it will ask where to save the generated key:
- Path: Press Enter to save it in the default location:
~/.ssh/id_rsa. - Passphrase: You’ll also be asked if you want to set a passphrase for an additional layer of security. Leave this blank (so you won’t have to enter it when connecting).
Step 2: Copy the generic public key to the Raspberry Pi.
Now, we need to copy the newly generated public key to the Raspberry Pi so that it will recognize the Linux Mint PC when we log in via SSH.
Run the following command on your Linux Mint machine to copy the public key to your Raspberry Pi:
ssh-copy-id pi@<raspberry_pi_IP>You’ll be prompted to enter your Raspberry Pi’s password one last time during this step, but after this, the SSH key authentication will be set up.
This command copies your public key to the ~/.ssh/authorized_keys file on your Raspberry Pi.
That’s it. You’ll be able to SSH into your Raspberry Pi without needing a password.
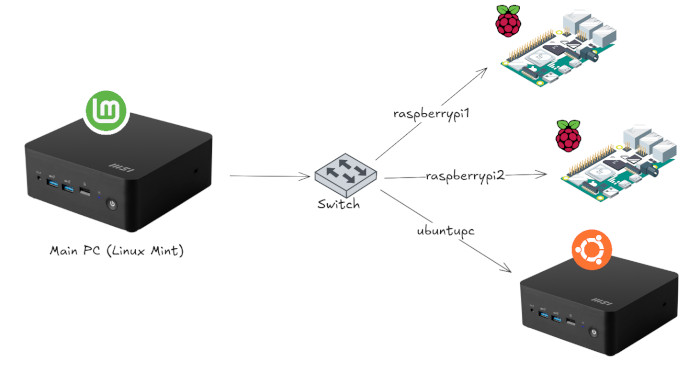
Option B: Multiple Connections
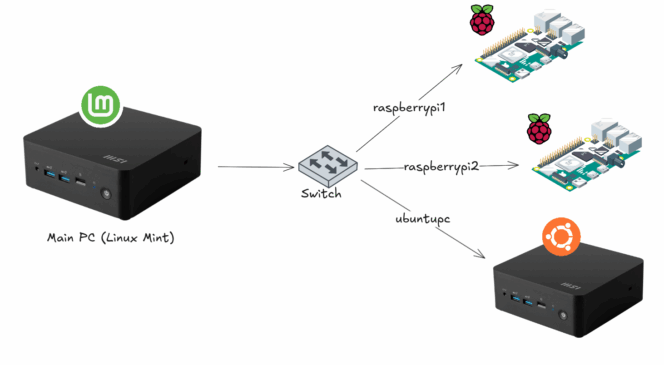
Step 1: Generate and store key in a custom file, dedicated to a certain host (use this if you plan to connect to multiple Raspberry Pis via SSH keys, each with its own file)
ssh-keygen -t rsa -b 4096 -f ~/.ssh/id_raspberrypi1
ssh-keygen -t rsa -b 4096 -f ~/.ssh/id_raspberrypi2
ssh-keygen -t rsa -b 4096 -f ~/.ssh/id_ubuntupc
This command saves the keys to these locations:
~/.ssh/id_raspberrypi1and~/.ssh/id_raspberrypi1.pub~/.ssh/id_raspberrypi2 and~/.ssh/id_raspberrypi2.pub~/.ssh/id_ubuntupcand~/.ssh/id_ubuntupc.pub
Step 2: Copy the keys.
ssh-copy-id -i ~/.ssh/id_raspberrypi1.pub -o IdentitiesOnly=yes pi@<raspberry_pi1_IP>
ssh-copy-id -i ~/.ssh/id_raspberrypi2.pub -o IdentitiesOnly=yes pi@<raspberry_pi2_IP>
ssh-copy-id -i ~/.ssh/id_ubuntupc.pub -o IdentitiesOnly=yes user@<ubuntupc_IP>
-i ~/.ssh/id_raspberrypi1.pub(and so on for all remaining devices) tells SSH which public/private key pair to use.-o IdentitiesOnly=yesprevents SSH from trying all other keys in your keychain.
Test the SSH Connection
Try connecting to your devices again, but this time without providing a password. Simply run:
ssh user@<ubuntupc>That’s it. You now have SSH fully set up between your Linux Mint machine and your Raspberry Pi (or any other Linux device on your network).
I use this setup daily to manage my Pis and other servers around the house, it’s one of those small tweaks that quietly makes everything more efficient.